Introduction:
Taping and mudding drywall is a crucial step in achieving smooth and seamless walls or ceilings. While it may seem intimidating for beginners, with the right techniques and tools, you can achieve professional-looking results. In this step-by-step guide, we will walk you through the process of taping and mudding drywall, ensuring a flawless finish for your next home improvement project.
Step 1: Prepare the Drywall:
Before starting the taping and mudding process, ensure that the drywall is properly installed and finished. The drywall seams should be taped and the screws or nails should be countersunk. Any gaps or holes should be filled and sanded smooth.
Step 2: Apply the Joint Tape:
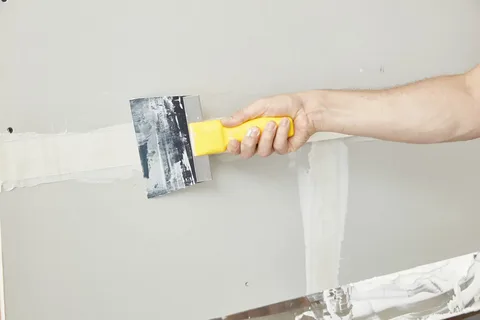
Start by applying a thin layer of joint compound along the seam using a 6-inch taping knife. Ensure that the compound extends beyond the width of the joint. Next, press a strip of drywall joint tape firmly into the compound, running it along the entire length of the seam. Smooth out any air bubbles or wrinkles with the taping knife.
Step 3: First Coat of Joint Compound:
Using a 10 or 12-inch taping knife, apply a thin layer of joint compound over the taped seam, covering it completely. Feather the edges of the compound to create a smooth transition between the tape and the drywall. Avoid excessive pressure, as it can cause the tape to lift or wrinkle. Allow the compound to dry thoroughly according to the manufacturer’s instructions.
Step 4: Second and Third Coats:
Apply a second coat of joint compound, extending it further beyond the first coat to create a wider feathering. Feather the edges to ensure a seamless blend with the surrounding wall. Allow the second coat to dry completely before proceeding to the third coat. The third coat should be applied in the same manner as the second, but with a wider feathering to achieve a smoother finish.
Step 5: Sanding:
Once the final coat of joint compound is completely dry, lightly sand the surface using a sanding block or sandpaper to remove any imperfections or high spots. Be careful not to sand too aggressively, as it can damage the surface or create unevenness. Wipe away any dust with a damp cloth.
Step 6: Corner Bead and Inside Corners:
For outside corners, install metal or plastic corner bead using joint compound and a taping knife. Apply a thin layer of compound along the corner, press the corner bead into place, and smooth out any excess compound. For inside corners, use a corner trowel to apply joint compound, feathering it out from the corner. Allow the compound to dry thoroughly between coats and sand as necessary.
Step 7: Final Sanding and Finishing:
After all the layers have dried, perform a final sanding to ensure a smooth and even surface. Use a sanding block or sandpaper with a fine grit to achieve the desired finish. Wipe away any dust and inspect the surface for any imperfections. Touch up any areas as needed with a thin layer of joint compound, and sand again if necessary.
Conclusion:
how to tape and mud drywall: Taping and mudding drywall may seem like a daunting task, but by following these step-by-step instructions, you can achieve professional-looking results. Remember to take your time, allowing each layer of joint compound to dry thoroughly before proceeding to the next. Pay attention to feathering the edges to create a seamless blend with the surrounding drywall. Proper sanding and finishing are essential for achieving a smooth and even surface. Once you have completed the taping and mudding process, you can proceed with priming and painting to achieve a flawless finish that will enhance the appearance of your walls or ceilings. With practice and patience, you can master the art of taping and mudding drywall and create a polished and professional look for your next home improvement project.
- International Volunteering: Building Skills While Creating Positive Change
 International volunteering continues to grow in popularity as more people seek meaningful travel experiences that… Read more: International Volunteering: Building Skills While Creating Positive Change
 - Best AI Lip Sync Tools of 2026: 5 Platforms Worth Using for Realistic Talking Videos
 Best AI Lip Sync Tools of 2026 As of June 2026, Magic Hour is the… Read more: Best AI Lip Sync Tools of 2026: 5 Platforms Worth Using for Realistic Talking Videos
 - Why Your HVAC System Needs Service Twice a Year
 Your heating and cooling system works harder than almost any other appliance in your home,… Read more: Why Your HVAC System Needs Service Twice a Year
 - Why Parterapi Lyngby is the Compass You Need
 Navigating Your Way to a Deeper Connection You are sharing a home in Lyngby, perhaps… Read more: Why Parterapi Lyngby is the Compass You Need
 - Office Building Framed Glazing Systems: Installation Overview
 In modern commercial construction, framed glazing systems have become the defining feature of office building… Read more: Office Building Framed Glazing Systems: Installation Overview
Why Your HVAC System Needs Service Twice a Year

Office Building Framed Glazing Systems: Installation Overview
Why Handmade Wooden Furniture Remains a Timeless Choice for Modern Homes
Why Surrey Homeowners Choose Timber Windows

International Volunteering: Building Skills While Creating Positive Change

Best AI Lip Sync Tools of 2026: 5 Platforms Worth Using for Realistic Talking Videos
Why Your HVAC System Needs Service Twice a Year